
How To Clip Trim My Puppy Dogs Nails – Minus The Freak Out 🐾
Puppy Nail Cutting
Maintaining proper nail length is crucial for a dog’s health, comfort, and posture. When nails become too long, they can cause pain, deform the foot structure, and lead to serious mobility issues. This in-depth guide covers everything you need to know about this essential grooming task, from selecting the right tool to handling common challenges like dark nails and uncooperative pets.
Understanding the Dog Nail Anatomy
Before beginning, it’s vital to understand the structure of a dog’s nail:
• The Nail Casing: The hard, exterior keratin layer.
• The Quick: The pink core of the nail. This is the living tissue that contains the blood vessels and nerves. Cutting into the quick is painful and will cause bleeding.
• The Paw Pad: The soft base of the paw where the dog bears weight.
The goal of cutting dog nails is to trim the clear or white tip of the nail, getting as close as possible to the quick without touching it.
Choosing Your Tool: Dog Nail Trimmers
Selecting the right tool makes the job easier and minimizes stress for both you and your pet. There are two primary types of dog nail clippers and one alternative tool:
• Scissor/Miller’s Forge Style: These function like heavy-duty scissors. They are excellent for small dogs and puppy nail clippers because they are lightweight and easy to handle.
• Guillotine Style: The nail is inserted into a small loop, and a blade slides through to make the cut. These are typically best for small to medium-sized breeds.
• Grinder (Dremel-style): These dog nail trimmers file the nail down slowly using a rotating abrasive head. They are fantastic for gradually exposing the quick and smoothing the edges, but they require a tolerance for the sound and vibration.
For puppy nail clippers, the scissor-style is often preferred due to the small size and thinness of a puppy’s nails.
Step-by-Step Technique for Cutting Dog Nails
Consistency and a positive attitude are key to success.
1. Preparation and Positioning
• Gather Supplies: Have your pet nail clippers, high-value treats, and Styptic Powder (or cornstarch) ready in case of a quicking accident.
• Find a Comfortable Spot: Choose a quiet, well-lit area. You need to be able to see the nail clearly.
• Acclimation: Spend time touching and handling your dog’s paws regularly, not just when it’s time for a trim. For puppies, this is part of learning how to cut puppy nails—it’s about positive exposure.
2. The Trim
• Hold the Paw Firmly: Gently but firmly hold the paw, using your thumb on the paw pad and your index finger on top of the toe. Press gently on the paw pad to extend the nail fully.
• Position the Dog Nail Cutter: Place the dog nail cutter perpendicular to the nail, aiming to take off only the very tip.
• The Angle: Cut at a slight angle, following the natural curve of the nail.
• The Cut: Make a swift, clean cut. Immediately reward with a high-value treat after each successful cut. Stop after a few nails if the dog is getting stressed.
3. Cutting Dog Nails Black (The Quick Challenge)
Black or dark-pigmented nails pose the biggest challenge because the quick is hidden. Use these techniques:
• The “Shaving” Technique: Instead of one large clip, take tiny, thin slices off the end of the nail, checking the cross-section after each cut.
• The Quick Indicator: When you approach the quick, the cross-section of the nail will first appear white and chalky. As you get closer, a tiny grey or black dot will appear in the center—this is the beginning of the quick. STOP CUTTING IMMEDIATELY.
• Cutting to the Quick: If you clip the quick, apply Styptic Powder immediately and hold pressure until the bleeding stops. Do not continue trimming after an incident; end the session on a positive note.
How to Cut an Uncooperative Dog’s Nails
This is a common issue that requires patience, positive reinforcement, and sometimes, creative approaches.
• Start Small and Build Trust: The dog’s fear is often rooted in past negative experiences. Start by just touching a paw and giving a treat. Next session, touch the paw and show the clippers, then treat. Next session, clip one nail and flood them with praise and treats.
• Change the Environment: Try a different location. Sometimes trimming in a bathtub or on a mat they only use for grooming can help.
• Positional Changes: Try trimming when the dog is relaxed (or even asleep, though this is difficult). If they struggle when you hold their paw, try lying on the couch with them and discreetly trimming while they are comfortable.
• Use Licking Distractions: Smear peanut butter or cream cheese on a lick mat or piece of plastic wrap attached to a wall. The sustained, repetitive licking action can be calming and distract them for the necessary time.
• Seek Professional Help: If fear is extreme, consult a professional groomer or veterinary technician who can handle the trimming safely. They can also offer specific advice based on your dog’s temperament.
Regular maintenance every 2–4 weeks is necessary to keep the quick receding and ensure comfortable movement for your cherished companion.
Buy Now
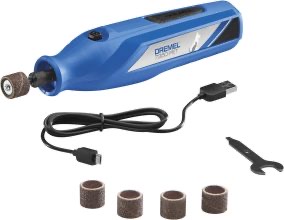
Everyone is afraid to cut their puppy nails. This dremmel relieves that fear. Our puppies have had their nails dremmeled weekly so if you will simply do it every week or two, it will be a breeze. See what it looks like up close